Saturday, September 5, 2015

Black and White Card

Ok so today I've finished making my black and white card for the make it crafty CAS challenge.  I wanted to make something fun so put in a slider into the card. I don't usually make Halloween cards so even though it looks like one its not.  Bear with my instructions I made a couple of mistakes and had to fix them along they way so that's why you may not see pieces in the pictures.

First my card base is 5x7 so my top layer is 6.75" x 4.75" and the circle is 2.7" in diameter I used my silhouette to cut this out. You will also need:

4 strips of cardstock 4 1/2"x 1/2"
3 strips of cardstock 3 1/2" x 1/2"
1 strip of cardstock 4" x 1-1/2"
1" circle

Background and grave yard are from the silhouette design store and so is the pattern on the moon

Swirl background
Halloween creepy graveyard
webbed paper
 After gluing the background onto my white cardstock I cut off the excess.  Then I started to cut pieces of cardstock to make the slider element.
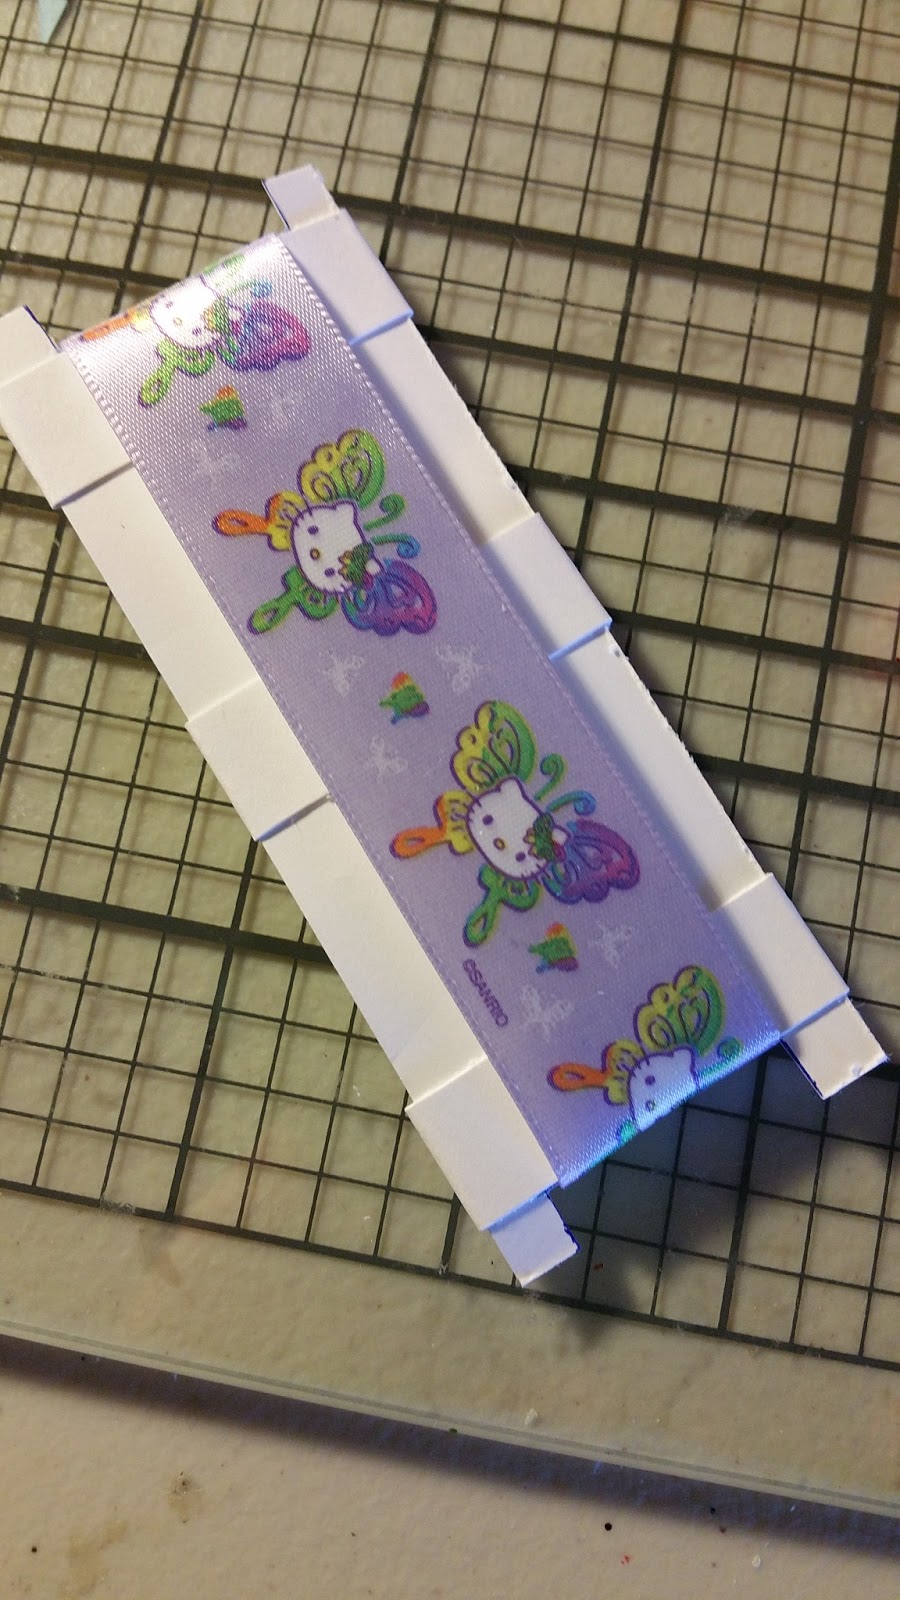
This piece of cardstock measures 4"x1 1/2" and at the ends I cut out tabs at 1/4" x 1" the is where your ribbon will lay and you want the notches on each side to keep it in place.

 
 Take 3 strips of cardstock measuring 3 1/2" x 1/2" and glue one to each end being careful not to overlap your tabs and one in the middle. these will be used to glue our piece down to the base.
 my ribbon measured 7/8" wide and I cut it at 8". I used terrifically tacky tape its double sided to stick the ribbon together. Make sure your ribbon isn't pulled too tight on the cardstock so that it will still move with ease. One on both ends one on top on one side and one on the bottom on the other side.
Get 2 strips of cardstock 4 1/2" x 1/2" and glue them together for you push tab. this should run along the length of your ribbon under the tabs and only glued down( I used tacky tape for this) to one end about 1" worth. For a visual scroll down to the next steps. this was a step I thought I could skip so didn't take a picture of it till I had to add it. Now fold your side tabs down under the bottom and glue them together making sure not to get them stuck to the ribbon.
 This is what the top of your slider piece should look like when done.
 Position your slider on your cardstock matching where you want your image to fall when its pulled. I used a white pencil to mark my position before I glued it down. Glue the bottom of your slider tabs that are over the ribbon to the base again making sure not to get any glue on the ribbon.  Also glue down the tabs at the ends.
 Now glue 2 strips of cardstock 4 1/2"x 1/2" together this will be your pull tab. I cut out a 1" circle to glue my image to because I need the extra support.  You can avoid that step depending on your image or how you cut it out.
 Next I used the tacky tape to stick my pull tab to the ribbon about 1" from the end with the circle.
 I positioned my image to be able to be hidden but pop out when the tabs are pulled. At the end of my pull tab I added a 3/16 eyelet and some black ribbon. for the push tab once it was in position I trimmed off the end so it wouldn't stick out of the card so much.

The image is from Make It Crafty mini gothilia.
copics used:

Hair -C9, C7, C5, C3
         T0,T3, T5, T7
Skin - W0, W3, W5
Dress - N9, C7, N4, N2
Bandage - T3, T0
 The font I used for the boo was batfont and I covered it with black glitter.

Hope you liked my card and my instructions weren't to confusing!

Friday, September 4, 2015

So I've finally finished this card that's been sitting on my craft table for literally weeks now.  As you can see I need some practice on wavy hair! I really don't know how people keep up with their blogs so many details to write down! So here we go....


Wheel card design from the silhouette design store
Wave border from miss kate cuttables

Front of card
Stamps: Tiddly Inks - Magical friendship
              Make it crafty - Make a wish Asha (dragonfly & sentiment)
                                        Spring blue birds Jena (clouds & bird)

Copics used:

Wryn: Hair- E21, E25, E29, E49
           Skin - E04, E11, E00, E000, R20
          Outfit - B000, B00, B02
                       Y32, YR21, YR12, E21
Mermaid: Hair- 100, C9, C7, B32, B24
                 Skin - E04, E11, E00, E000, R20
                 Top - YR00, YR02, YR04
                 Tail - YR00, YR02,YR04, YR07, E08, E39
Dirt - E35, E31, E33,E59
Grass - YG61, YG13, YG95, YG25, G99
Ocean - B05, BG10, BG15

For the dragonfly I colored him in with a pearlessence to give him a shimmer and the bird is only has C0 where the cast shadows should be.  For the clouds I used stampendous white embossing powder. I also used an eyelet to set the wheel in place.
For the inside I put down a piece of light blue vellum and used a crackle stencil with my copic airbrush and B01 to give it an under water look.

On the inside of the cardstock I stamped it with Tiddly Inks Floating By. The fish are colored with copics YR00, YR02, YR07, YR04 and the crab is R24, R27, R29, C5. I used Stampendous white and gold embossing powder to give it a little bit of a sandy look.
 
Thanks for stopping by!

An inspired by challenge

 Today I have a new make I did for the Whimsy Stamps world card making day "Inspired by Challenge". I was inspired by Sue Hastead&...